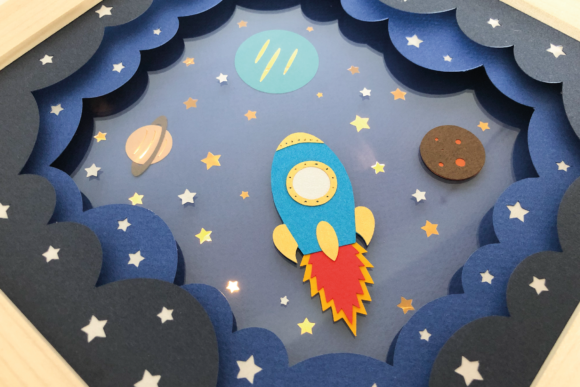
Launch Your Creativity: Mastering the Rocketship 3D Shadow Box Template
There is a distinct satisfaction in transforming flat sheets of cardstock into a dimensional scene that seems to float in mid-air. The Rocketship - 3D Shadow Box Template captures this magic perfectly, offering a vibrant, out-of-this-world design that appeals to crafters of all skill levels. Whether you are a hobbyist looking for a weekend project, an educator teaching spatial reasoning, or a small business owner creating unique nursery decor, this template provides a solid foundation. However, jumping straight into cutting without understanding the nuances of layered paper crafting can lead to frustration. Many creators underestimate the precision required for 3D assembly, often resulting in a final product that looks flat or feels unstable. By approaching this project with a clear plan and an awareness of common pitfalls, you can ensure your rocketship soars rather than stalls.
Choosing the Right File Format for Your Tools
One of the first hurdles crafters face is selecting the appropriate file type from the download package. This template is versatile, including DXF, SVG, PNG, EPS, and PDF formats, but using the wrong one for your specific workflow is a frequent misstep. If you own an electronic cutting machine like a Silhouette Cameo or Cricut, you might be tempted to use the PNG files for convenience. While PNGs work for print-then-cut projects, they lack the vector data necessary for clean, scalable cut lines. Relying on raster images for cutting can result in jagged edges and lost detail, especially on intricate spacer pieces.
For machine users, the layered DXF or SVG files are superior choices. These vector formats allow your software to recognize each layer of the shadow box individually, ensuring that the foreground stars, the rocket body, and the background clouds cut precisely. Conversely, if you prefer hand-cutting, the included PDF files are your best friend. A common mistake here is attempting to print the vector files directly onto cardstock without checking the scale. The template is supplied as an 8-inch square (20cm x 20cm) for machines, with PDF versions available in both 8-inch and 9-inch (23cm x 23cm) sizes. Crucially, the PDFs are mirrored and flipped ready for printing. Ignoring this detail and trying to manually flip images in your printer settings can lead to asymmetrical designs where text reads backward or directional elements face the wrong way.
The Critical Role of Spacers and Depth
The difference between a standard paper collage and a true shadow box lies in the depth. A significant number of beginners overlook the importance of the spacer layers, viewing them as mere structural necessities rather than design elements. If your spacers are too thin, the layers will crush together, eliminating the 3D effect and casting unwanted shadows that muddy the colorful design. If they are too thick or uneven, the box may not close properly, or the layers might bow outward.
To avoid this, pay close attention to the assembly instructions included with the download, which specifically detail how to make effective spacers. Do not substitute recommended materials with whatever scrap paper is handy. Foam adhesive squares or stacked chipboard often yield better results than folded paper strips, which can compress over time. A practical approach is to test your spacer height before gluing the entire assembly. Place a few layers on top of your base with the spacers in between and view them from an angle. You want enough separation to let light play between the layers, enhancing the "out of this world" feel, but not so much that the structure becomes fragile.
Resizing Without Losing Proportion
Flexibility is a key feature of this template, as it can be resized within your cutting software to fit various frame sizes. However, resizing introduces the risk of distorting proportions or making details too small to weed and assemble. When scaling up the design beyond the standard 8 or 9-inch footprint, remember that the thickness of your cardstock remains constant. A design that works beautifully at 8 inches might look clunky at 14 inches if the spacer width isn't adjusted accordingly.
Before committing to a large batch of cuts, perform a test run with a single layer. Check if the intricate details of the rocket fins or the small stars hold up when enlarged. If you find that certain elements are becoming too delicate to handle, it may be better to stick closer to the original dimensions or simplify the layer count. Additionally, ensure your cutting mat is large enough for the new size; trying to force a larger design onto a smaller mat often leads to shifting material and ruined cuts.
Material Selection and Color Strategy
The template is designed to be colourful, but the final aesthetic depends heavily on your material choices. A common error is using cardstock that is too heavy for the intricate inner cuts or too light to hold its shape against gravity. For the main structural layers, a 65lb to 80lb cardstock is generally ideal. It offers enough rigidity to stand up in the box while remaining flexible enough for detailed cutting. Using printer paper will result in a flimsy project, while heavy watercolor paper might jam your cutting blade or prove impossible to layer neatly.
Color selection also requires forethought. Because this is a shadow box, the colors of the layers behind will peek through the cutouts of the layers in front. If you choose a dark background with dark foreground elements, the definition will be lost. Instead, aim for high contrast. Use the layered nature of the file to your advantage by selecting complementary colors for adjacent layers. For instance, placing a bright orange rocket against a deep purple nebula background creates a dynamic visual pop that flat printing cannot achieve.
Final Assembly and Presentation
Even with perfect cuts and great materials, poor assembly can ruin the project. Rushing the gluing process is perhaps the most detrimental habit. When adhering layers, it is easy to apply too much glue, which can warp the paper or seep out around the edges, leaving visible residue. Use a fine-tip applicator or a glue pen for precise control. Start assembling from the back of the box and work forward, checking alignment after every single layer. Once a layer is glued down, it is difficult to adjust without damaging the surrounding pieces.
Before sealing your shadow box, take a moment to inspect it under different lighting conditions. Shadow boxes rely on light to create their dimensionality. Ensure that no stray glue strings or misaligned tabs are casting odd shadows. If you plan to sell these creations or gift them, consider the framing. The 8-inch and 9-inch sizes fit standard square frames readily available at craft stores, but custom framing may require adjusting the outer border of the design in your software beforehand.
Ultimately, the Rocketship - 3D Shadow Box Template is a powerful tool for creating stunning decor, provided you respect the mechanics of paper engineering. By selecting the correct file types, respecting the need for proper spacing, choosing suitable materials, and assembling with patience, you transform a digital download into a tangible piece of art. Whether you are building this for a child's room, a classroom display, or a boutique inventory, taking these corrective steps ensures your final launch is successful and your creation truly stands out.