Crafting Depth: Integrating the Kingfisher Bird 3D Shadow Box Template into Your Creative Workflow
In the realm of paper crafting and digital design, the transition from a flat concept to a tangible, three-dimensional object requires more than just artistic vision; it demands a structured approach to file management, material selection, and assembly logic. The Kingfisher Bird - 3D Shadow Box Template serves as an exemplary case study for how pre-designed assets can streamline this process. Whether you are a small business owner looking to expand your product line, an educator teaching spatial reasoning, or a hobbyist seeking a weekend project, understanding how to integrate this specific template into your existing workflow is key to achieving professional results efficiently.
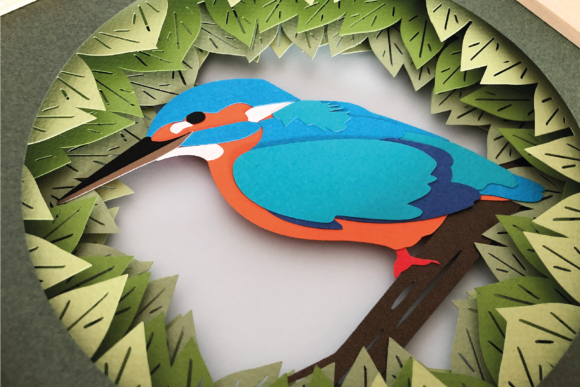
This majestic kingfisher bird design is not merely a static image but a layered system engineered for depth. By utilizing a combination of vibrant colors and strategic layering, the template transforms a standard sheet of cardstock into a dynamic piece of wall art. The true value of this asset lies in its versatility across different production methods, accommodating both manual craftsmanship and automated precision cutting.
Selecting the Right Production Method for Your Scale
The first decision point in your workflow involves choosing the appropriate file format based on your available tools and the volume of production required. The Kingfisher Bird - 3D Shadow Box Template is supplied with a comprehensive suite of file types, including DXF, SVG, PNG, EPS, and PDF. This variety ensures compatibility with a wide range of hardware and software ecosystems.
For creators utilizing electronic cutting machines such as the Silhouette Cameo or Cricut, the layered DXF and SVG files are the primary assets. These formats preserve the individual layers necessary for creating the shadow box effect. When importing these files into your cutting software, you maintain the ability to resize the design while retaining vector integrity. The default supply size is an 8-inch square (20cm x 20cm), which fits standard framing options, but the vector nature of SVG and DXF allows for seamless scaling up or down to meet specific client requests or display requirements without pixelation.
Conversely, for those who prefer hand-cutting or do not have access to digital die-cutters, the included PDF files offer a ready-to-print solution. These are provided in two distinct sizes: the standard 8-inch (20cm x 20cm) and a slightly larger 9-inch (23cm x 23cm) version. A critical detail in the preparation phase is that these PDFs are already mirrored and flipped. This pre-processing step eliminates a common source of error in shadow box construction, where text or directional elements might end up backward after assembly. By addressing this during the file generation stage, the template saves time and reduces material waste during the physical cutting phase.
Material Preparation and Asset Organization
Efficiency in creative projects often hinges on the organization of materials before the first cut is made. Working with a multi-layered design like the kingfisher bird requires a disciplined approach to color mapping and stock management. Before sending files to your cutter or printing PDFs, it is essential to review the layer structure within your design software.
The template relies on the contrast between layers to create the illusion of depth. Therefore, selecting cardstock with varying textures or finishes can enhance the final outcome. For instance, using a matte finish for the background layers and a slight sheen for the bird's feathers can catch light differently, adding to the three-dimensional effect. When preparing your digital canvas, assign specific colors to each layer in your software to match your physical paper stack. This visual checklist acts as a quality control measure, ensuring that no layer is missed during the cutting or printing process.
Furthermore, consider the weight of the paper. Since this project involves stacking multiple layers, using cardstock that is too heavy may make the frame too deep for standard shadow boxes, while paper that is too thin may lack the structural rigidity needed to hold the spacers. A weight between 65lb and 80lb cover stock is generally ideal for balancing durability with ease of cutting.
The Assembly Process: Building Depth Systematically
Once the components are cut or printed, the project moves into the assembly phase. This is where the Kingfisher Bird - 3D Shadow Box Template transitions from a collection of parts to a cohesive artwork. The included assembly instructions provide a roadmap, but understanding the mechanics of spacing is vital for a polished finish.
The core mechanism of a shadow box is the spacer. These small elements sit between the paper layers, lifting them apart to create shadows and physical depth. The template instructions detail how to make these spacers, which is a crucial skill for long-term use. While some crafters purchase pre-made foam adhesive squares, creating your own spacers from scrap cardstock offers greater control over the exact height of each layer. This customization allows you to adjust the depth dynamically; for example, you might want the kingfisher's beak to protrude further than the background reeds to emphasize focus.
- Layer Sequencing: Begin by arranging all cut layers in order from back to front on a clean surface. Verify that the mirrored PDF prints align correctly if you are using the hand-cut versions.
- Spacer Placement: Apply spacers strategically. They should be placed in areas that will be hidden by the subsequent layer to maintain a clean aesthetic. Avoid placing spacers near the edges where they might be visible through the glass of the frame.
- Adhesion Strategy: Use a high-quality adhesive suitable for paper. Liquid glue can warp thin paper, so adhesive dots or double-sided tape are often preferred for precision. Ensure each layer is perfectly aligned before pressing down, as misalignment at the base compounds as you move up the stack.
- Framing: Once assembled, the unit is ready for the frame. Ensure the total depth of your stacked layers plus the spacers does not exceed the depth capacity of your shadow box frame.
Integrating into Business and Educational Workflows
For entrepreneurs and small business owners, this template represents more than a single project; it is a scalable asset. Because the files are resizable and compatible with industry-standard machines, you can easily adapt the Kingfisher Bird - 3D Shadow Box Template for different product tiers. You might offer the 8-inch version as a standard item and the 9-inch version as a premium option, or create custom colorways for seasonal collections without redesigning the vector paths from scratch.
In an educational setting, this project serves as an excellent tool for teaching geometry, spatial awareness, and following technical instructions. Educators can use the layered DXF or SVG files to demonstrate how 2D shapes combine to form 3D structures. The process of making spacers and assembling the layers reinforces fine motor skills and patience. Furthermore, the availability of both digital and hand-cut formats allows instructors to tailor the activity to the resources available in their classroom, ensuring inclusivity regardless of budget constraints for equipment.
Long-Term Usability and File Management
To maximize the value of this purchase, proper file management is essential. Store the Layered DXF, SVG, PNG, EPS, and PDF files in a dedicated folder structure on your cloud storage or local drive. Label versions clearly, especially if you create modified color schemes or resized variations for specific clients. Having the original, unaltered files preserved ensures that you can always return to the source material if a project needs to be recreated or adjusted years later.
Additionally, keep a physical log of the materials used for successful iterations. Note the brand of cardstock, the specific blade depth used on your cutting machine, and the type of adhesive that held best. This documentation turns a one-off craft project into a repeatable business process, reducing trial and error in future productions.
The Kingfisher Bird - 3D Shadow Box Template exemplifies how well-structured digital assets can bridge the gap between idea and execution. By respecting the preparation steps, utilizing the correct file formats for your tools, and adhering to a systematic assembly process, you can produce high-quality, professional-grade art. Whether for personal enjoyment, classroom instruction, or commercial sale, this template provides the foundation for a streamlined and satisfying creative workflow.