Sloth on a Branch 3D Shadow Box Papercut Guide
Hello, crafters. There is a distinct satisfaction in transforming a flat sheet of paper into a scene that breathes with depth and life. The Sloth on a Branch 3D Shadow Box Papercut represents more than just a cutting project; it is an exercise in patience, layering, and visual storytelling. This layered, square paper cutting template invites you to step away from the digital noise and engage with tangible materials, resulting in a piece of art that captures the slow, deliberate beauty of nature.
At its core, this project utilizes an 8-layer design sized at 20.32×20.32 cm. While the dimensions are specific, the creative potential is expansive. Whether you are a seasoned designer looking to expand your product line, an educator teaching spatial awareness, or a hobbyist seeking a relaxing weekend activity, this template offers a structured yet flexible foundation. The inclusion of multiple file formats—SVG, PDF, EPS, PNG, and DXF—ensures that regardless of your preferred workflow, you have the tools necessary to begin immediately.
The Mechanics of Depth and Dimension
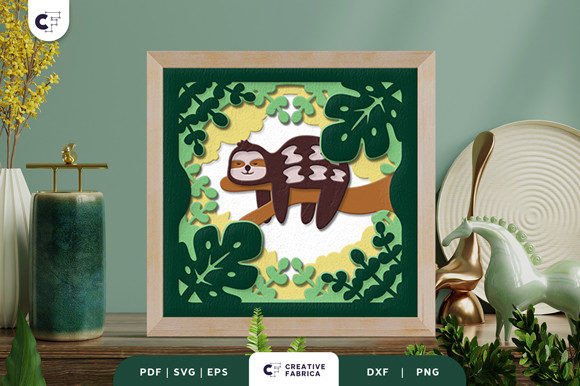
What makes the Sloth on a Branch 3D Shadow Box Papercut particularly interesting is how it leverages shadow and separation to create illusion. Unlike traditional 2D silhouettes, this design relies on the physical space between layers. When assembled, the gaps between the eight distinct sheets allow light to travel through the piece, casting soft shadows that define the contours of the sloth and the texture of the branch.
For those using electronic cutting machines like Silhouette or Cricut, the provided SVG files streamline the process. These vectors are resizable, provided you maintain the aspect ratio, allowing you to adapt the project for different frame sizes without losing detail. However, do not underestimate the value of manual crafting. If you do not have access to a machine, an art knife and scissors are perfectly capable tools for this job. The act of hand-cutting connects you to the rhythm of the design, forcing a slower pace that mirrors the subject matter itself.
To assemble the design effectively, you will need glue or double-sided tape. The choice of adhesive matters; foam tape is often preferred for shadow boxes as it creates a consistent, elevated gap between layers, enhancing the 3D effect. Standard glue can work for flatter applications, but for true depth, spacing is key.
Creative Applications Beyond Wall Decor
While framed wall decoration is the most obvious application, limiting this template to a static image ignores its dynamic potential. Creative professionals and entrepreneurs can adapt this design for various contexts, turning a single template into a diverse portfolio of products.
- Illuminated Light Boxes: By integrating LED strips between the layers, you transform the papercut into a glowing night light or ambient decor. The light filters through the cutouts, highlighting the intricate details of the sloth's fur and the surrounding foliage. This variation is highly marketable for nurseries or cozy living spaces.
- Greeting Cards and Invitations: Scale down the design or use fewer layers to create high-end, handmade greeting cards. The tactile nature of the layered paper adds a premium feel that digital printing cannot replicate.
- Educational Tools: Educators can use this project to teach concepts of forestry, wildlife conservation, or even geometry and spatial reasoning. Assembling the layers requires logical sequencing, making it an excellent STEM-related art activity.
- Marketing Assets: Photograph the finished product with dramatic lighting to use as unique visual assets for blogs, social media, or branding materials. The organic textures provide a refreshing contrast to sterile stock photography.
Material Selection and Execution
The success of any papercut project hinges on material quality. For the Sloth on a Branch 3D Shadow Box Papercut, the weight and texture of the paper determine the structural integrity and the final aesthetic. We recommend using cardstock that is substantial enough to hold its shape without warping under the weight of the layers.
Specifically, Encore Cardstock 80 lb cover (216 gsm) is an ideal choice. This weight provides the necessary rigidity for the 8-layer structure while remaining easy to cut. It accepts ink well if you choose to print directly onto the paper, though many crafters prefer using pre-colored cardstock to achieve specific palettes. You can explore a wide variety of colors and finishes by visiting the 12×12 Cardstock Shop. Note that this is a paid link at no extra cost to you, supporting the curation of quality resources.
When selecting colors, consider the mood you wish to evoke. A monochromatic scheme using varying shades of green and brown emphasizes the natural habitat of the sloth, creating a sophisticated, gallery-ready look. Conversely, a whimsical approach might involve pastel backgrounds with vibrant foreground elements, appealing to a younger audience or a playful interior style. Remember that the images provided in digital previews are for reference only; the actual final product color may slightly vary due to lighting sources and the specific paper color you choose. This variability is part of the charm of handmade goods—no two pieces are exactly identical.
Adapting for Different Audiences and Goals
Flexibility is the hallmark of a good design template. Freelancers and small business owners can leverage the Sloth on a Branch 3D Shadow Box Papercut to create custom gifts for clients or family members. Because the SVG files are editable, you can subtly modify elements to personalize the piece. Perhaps you add a small heart, a name, or a date within the foliage layers. These small customizations elevate a standard template into a bespoke heirloom.
For content creators and bloggers, documenting the process of building this shadow box offers engaging material. Time-lapse videos of the cutting and assembly process perform well on social platforms, satisfying the viewer's desire for "oddly satisfying" content while showcasing your skills. Tutorials that explain how to manage the layers, which adhesive works best, or how to wire the LED lights add value to your audience and establish your authority in the crafting niche.
Consistency in your results comes from organization. Keep your layers labeled and ordered before you begin cutting. Use a lightbox or a bright window to align the layers during assembly, ensuring the sloth remains centered and the branch flows naturally across the frame. Taking the time to organize your workspace prevents frustration and ensures the final product looks polished and professional.
Finding Inspiration in Simplicity
In a world that often demands speed and constant output, the sloth serves as a gentle reminder to slow down. Working on this project allows you to embrace that philosophy. Each cut, each layer of tape, and each moment of alignment is an opportunity to practice mindfulness. The result is not just a decorative object, but a testament to the value of deliberate creation.
Whether you frame it as a gift for a friend, install it as a light box in your studio, or sell it as part of a curated collection, the Sloth on a Branch 3D Shadow Box Papercut offers a versatile canvas for your creativity. It bridges the gap between digital convenience and analog craftsmanship, providing a grounded, practical way to produce something beautiful. Embrace the layers, respect the process, and let the final piece speak to the care you invested in its making.